Using the Cognito Hosted UI with an Application Load Balancer
Originally published: 2020-08-18
Last updated: 2020-08-18
AWS introduced the Application and Network load balancers in the summer of 2016, and I think
that most of the organizations that already used the newly-christened “Classic”
load balancer let out a big yawn. At the time, the primary benefit of the ALB was that it could
do path-based routing to multiple hosts. But this was a solved problem: either the applications
were monoliths that did routing internally, or were deployed with nginx or haproxy as a front-end. Plus, the ALB was a “layer 7”
load balancer: you couldn't use it to direct arbitrary TCP traffic (meaning no tricks like
using the ELB as a bastion host).
As with many AWS products, the ALB continually gained new features, with a flurry happening in the late spring and summer of 2018. Integration with the Cognito hosted UI was one of the most interesting to me: I'd spent time working with Cognito shortly after it came out in 2016, and came away less than impressed. At the time, Cognito was clearly targeted at client-side integration; the APIs that Could be used by a server were intended for “administrative” actions. By 2017, when the Hosted UI was introduced, I'd moved on to other things.
But, as I've said before, Cognito does offer a compelling feature set, and I recently had reason to use the hosted UI with a web-app. There are still some bits that aren't documented that well, and some quirks of the implementation that might not be immediately obvious, which is why I'm writing this article. That said, if you can use it, I wholeheartedly recommend that you do.
Many of the examples in this page use CloudFormation resource definitions; I believe that they're a better form of documentation than screenshots or command-line operations. They're from this template, which deploys a simple web-app using a Lambda to respond to API requests.
Configuring the Cognito Hosted UI
If you're not familiar with the hosted UI, here's a picture of it:
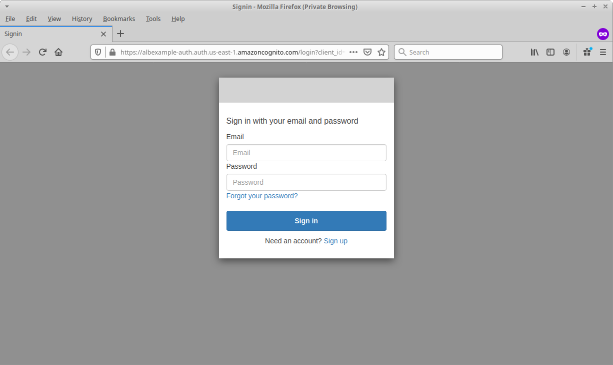
As you can see, it's a simple username/password field. This image uses default styling; you
can change some but not all elements to customize it for your application. If you look
closely, you can see that it's hosted in the domain amazoncognito.com;
you can change that to be a hostname within your own DNS domain, although there are restrictions.
What's nice about the hosted UI is that it supports all of the Cognito user flows: logging in, of course, but also signing up for a new account (if enabled), confirming that new account, and changing a forgotten password. While these things are not necessarily difficult to build yourself, using the hosted UI saves you time that can be spent on other parts of your web-app.
There are two steps to enabling the hosted UI. First, you must pick a domain name, which is
surprisingly tricky. If you already have a registred domain, you will probably want to use it.
However, there are several prerequisites to doing so, including a requirement that the domain root
must be an “A” (address) record. In other words, if you want to use
auth.example.com for Cognito, then example.com must be point to a physical server. If you have a dedicated domain for your application this
may not be an issue; if you're working inside a corporate domain structure, it probably will be.
The alternative is to pick a name within the amazoncognito.com domain.
Similar to S3 bucket names, this namespace is shared between all AWS accounts; unlike S3,
names must only be unique within the desired region. You almost certainly won't be able to use
“example” or “auth”. You also aren't
allowed to use anything that contains “cognito”: it's a reserved
hostname in the AWS world. I recommend using a reverse-DNS name like
“com-mycompany-myapp”; you can use up to 63 alpha-numeric-hyphen
characters.
Here's an example CloudFormation configuration, using the amazoncognito.com domain with a hostname passed as a stack parameter.
CognitoUserPoolDomain:
  Type:                               "AWS::Cognito::UserPoolDomain"
  Properties:
    UserPoolId:                       !Ref CognitoUserPool
    Domain:                           !Ref AuthHostname
The next step is configuring the Cognito application client. This is described in general terms in the Cognito documentation, but you also need to read the load balancer documentation for specific configuration elements (particularly, required scopes and callback URLs). Here is the configuration I'm using:
CognitoUserPoolClient:
  Type:                               "AWS::Cognito::UserPoolClient"
  Properties:
    UserPoolId:                       !Ref CognitoUserPool
    ClientName:                       "default"
    SupportedIdentityProviders:       [ "COGNITO" ]
    AllowedOAuthFlowsUserPoolClient:  true
    AllowedOAuthScopes:               [ "openid", "email" ]
    AllowedOAuthFlows:                [ "code" ]
    CallbackURLs:                     [ !Sub "https://${Hostname}.${DNSDomain}/oauth2/idpresponse" ]
    GenerateSecret:                   true
    RefreshTokenValidity:             7
There are a few things to call out in this configuration:
-
SupportedIdentityProviderssays that we're using a Cognito user pool as the user database, rather than a “social” provider such as Google. -
AllowedOAuthFlowsUserPoolClientenables the load balancer to use this user pool client for authentication. -
AllowedOAuthScopesmust include “openid” to work with the load balancer. It also includes “email” so that the user's email address will be included in the JWT token provided to the web-app. -
AllowedOAuthFlowscontrols the way that the client communicates with Cognito. You must use “code” to use from the load balancer; you can add “implicit” if your client will be contacting Cognito directly from your application. -
CallbackURLscontains the URL to which the user is redirected after a successful authentication. I'll go into more detail later, when I describe the authentication flows. For ALB integrations, it always has the formhttps://LOAD_BALANCER_HOSTNAME/oauth2/idpresponse(note that here I build the hostname from parameters that are passed into the stack).
Configuring the Load Balancer
Configuring the load balancer is straightforward: in any rules that should be authenticated,
you add an “authenticate-cognito” action before whatever action the
rule would otherwise take. In this example, I want to protect the “/api” path, and deny any requests from users that have not already been authenticated, so set the
OnUnauthenticatedRequest property to “deny”.
LoadBalancerAPIDispatchRule:
  Type:                               "AWS::ElasticLoadBalancingV2::ListenerRule"
  Properties:
    ListenerArn:                      !Ref LoadBalancerHTTPSListener
    Priority:                         20
    Conditions:
      - Field:                        "path-pattern"
        Values:
          -                           "/api/*"
    Actions:
      - Type:                         "authenticate-cognito"
        Order:                        100
        AuthenticateCognitoConfig:
          UserPoolArn:                !GetAtt CognitoUserPool.Arn
          UserPoolClientId:           !Ref CognitoUserPoolClient
          UserPoolDomain:             !Ref CognitoUserPoolDomain
          OnUnauthenticatedRequest:   "deny"
      - Type:                         "forward"
        Order:                        200
        TargetGroupArn:               !Ref APITargetGroup
That last bit — have not already been authenticated — is key: you
also need a route with an OnUnauthenticatedRequest value of
“authenticate”, which will initiate the series of redirects
shown in the next section. This is normally applied to the “home” page
for your application.
LoadBalancerHomeDispatchRule:
  Type:                               "AWS::ElasticLoadBalancingV2::ListenerRule"
  Properties:
    ListenerArn:                      !Ref LoadBalancerHTTPSListener
    Priority:                         10
    Conditions:
      - Field:                        "path-pattern"
        Values:
          -                           "/"
    Actions:
      - Type:                         "authenticate-cognito"
        Order:                        100
        AuthenticateCognitoConfig:
          UserPoolArn:                !GetAtt CognitoUserPool.Arn
          UserPoolClientId:           !Ref CognitoUserPoolClient
          UserPoolDomain:             !Ref CognitoUserPoolDomain
          OnUnauthenticatedRequest:   "authenticate"
      - Type:                         "forward"
        Order:                        200
        TargetGroupArn:               !Ref HomeTargetGroup
That doesn't look terribly tricky, does it? But it assumes a “micro service” architecture, in which separate target groups handle the API and home routes. If you have a monolithic architecture, you typically have a single target group that handles routing internally; you'll need to duplicate some of that routing in the ALB to enable Cognito. And if you have a “single page application” architecture, you might be loading the home page as static content; you'll need to move that content into the load balancer configuration (which I show below).
How requests are handled once Cognito is enabled
While the AWS documentation describes the authentication flows, I think some diagrams are helpful.
I'll start with the login flow: this happens when an unauthenticated user tries to go to a
page where the listener rule's OnUnauthenticatedRequest property is
“authenticate”:

As you can see, there's a lot of back-and forth. The first thing that happens is that the
load balancer discovers that the user hasn't been authenticated, which it does by looking
for a cookie (normally named “AWSELBAuthSessionCookie”, but you
can configure this if desired). For an unauthenticated user, that cookie is empty or has a
value that indicates authentication has expired.
When that's the case, the load balancer responds to this initial request by redirecting
the client to Cognito's authorization endpoint, /oauth2/authorize.
This endpoint is part of the OAuth 2.0 specification; it is responsible for verifying the user's identity and returning an
authorization code to the requester. I don't show the parameters passed to this request,
but there are several of them, including the Cognito client ID and (importantly) the URL
to which the user should be redirected after successful authentication.
Since this is an unauthenticated user, Cognito redirects to its own /login endpoint, which returns the hosted UI page content. This page requires some supporting static
content, loaded from an AWS-managed CloudFront distribution; I don't show those requests here.
The hosted UI page supports several interaction flows. For this diagram I'm showing the
simplest, in which the user enters their (correct) credentials and the form does a POST back
to the /login endpoint.
Assuming successful login, the hosted UI responds with a redirect to the load balancer's
/oauth2/idpresponse endpoint, providing authentication information.
This endpoint is handled internally by the load balancer; you don't need to add an explicit
rule for it. Behind the scenes, the load balancer stores the authentication information in
the session cookie (if you want to know more about this step, take a look at the OAuth2
page linked above).
Finally, he client is redirected back to the page that it originally requested. At this point, we can move on to the authorization flow.
But first, some terminology. “Authentication” refers to the process in which a user provides credentials (username and password) to an “identity server.” In the ALB/Cognito integration, the hosted UI is the identity server, and it returns a token that says that the user has passed that step successfully. “Authorization” is a separate step in which the application validates that the token is still valid and allowed to access the service.
When using the ALB/Cognito integration, authorization happens in two places. The first of these is the load balancer:

This is the general flow for any request that uses a Cognito-authorized rule. When the client makes a request, the load balancer does not immediately pass that request on to the application. Instead, it first contacts Cognito to authorize the request, passing the authentication data that it saved in the session cookie. This happens behind the scenes; neither your application nor the user are involved.
If the user is authorized, then the load balancer adds three headers to the request and passes it on to your application.
If the user is no longer authorized (either the authorization has expired or the user
was explicitly logged out), then what happens next depends on the listener rule's
OnUnauthenticatedRequest property:
- If it is set to “
deny”, as I used for the/apiendpoint, the client receives a 401 (Unauthorized) response. - If set to “
authenticate”, then the client is redirected to the authorization endpoint. You should only enable this for endpoints that return HTML content, so that the client can handle the redirect flows. - Lastly, the value “
allow” will let the request proceed without authorization. I can't see a case where you'd actually want to do that.
Validating authorization in your application
As I said above, the load balancer adds three headers to an authorized request:
| x-amzn-oidc-accesstoken | A JWT token that contains information about the user's authorization status: the Cognito user pool that authorized the user, the user's identity within that pool, when the user was authorized, and when the authorization expires. This should be your primary way to authorize a request. |
|---|---|
| x-amzn-oidc-data | A JWT token that contains additional user attributes managed by Cognito. As I've configured the user pool above, this is limited to the user's email address, but you can configure additional attributes. |
| x-amzn-oidc-identity | The unique identifier for the user within the Cognito user pool. For my example pool this is a UUID. |
If you are not familiar with JWT, the short description is that it's a way to encode information (“claims”) about a user. A token consists of three parts: a header, which identifies the signing algorithm and signature key; the payload, which contains the claims; and the binary signature. These three pieces are Base64-encoded and combined into a single string.
Using the decoder at jwt.io, here are the header and claims for two sample tokens (I've omitted the signature, which is just a series of bytes).
-
x-amzn-oidc-accesstokenheader: -
{ "kid": "O69l+/7w0rDheUK1BxhKYd15BZm5ZnUeYxroPtzWvss=", "alg": "RS256" } -
x-amzn-oidc-accesstokenpayload: -
{ "sub": "256e9913-c1ab-461b-b3f2-58ab40bd9df6", "event_id": "6580e854-57d7-4e48-82c6-ca3f704d3a7f", "token_use": "access", "scope": "openid", "auth_time": 1597144816, "iss": "https://cognito-idp.us-east-1.amazonaws.com/us-east-1_rc95776ud", "exp": 1597148416, "iat": 1597144816, "version": 2, "jti": "5480aca7-012a-4e8a-a417-2655a41f7756", "client_id": "186u6bp3uo400cpromr7nji8h0", "username": "256e9913-c1ab-461b-b3f2-58ab40bd9df6" } -
x-amzn-oidc-dataheader: -
{ "typ": "JWT", "kid": "27ffb1cc-efd3-4826-a5b2-961b4eb888dc", "alg": "ES256", "iss": "https://cognito-idp.us-east-1.amazonaws.com/us-east-1_rc95776ud", "client": "186u6bp3uo400cpromr7nji8h0", "signer": "arn:aws:elasticloadbalancing:us-east-1:123456789012:loadbalancer/app/Example/4c2620b361050145", "exp": 1597144938 } -
x-amzn-oidc-datapayload: -
{
  "sub": "256e9913-c1ab-461b-b3f2-58ab40bd9df6",
  "email_verified": "true",
  "email": "kdgregory@example.com",
  "username": "256e9913-c1ab-461b-b3f2-58ab40bd9df6",
  "exp": 1597144938,
  "iss": "https://cognito-idp.us-east-1.amazonaws.com/us-east-1_rc95776ud"
}
Of the various fields, here are the ones that you're most likely to care about:
| alg | Algorthm: the algorithm used to produce the signature. |
|---|---|
| kid | Key Identifier: a unique identifier for the key used to sign the token. |
| iss | Issuer: the service that issued the JWT. For Cognito, this takes the form of a URL:
“https://cognito-idp.REGION.amazonaws.com/USER_POOL_ID”.
|
| client_id | Client ID: identifies the Cognito user pool client (you can have multiple clients for a single pool, although the example only creates one). |
| sub | Subject: the user's unique identifier within the Cognito user pool. Note that
there's also a “username” claim, and the way that
I've configured the pool makes them the same; I believe that if you allow users
to pick their own usernames they will be different.
|
User email address. This is part of the user token because I enabled it in
AllowedOAuthScopes.
| |
| iat | Issued At: the timestamp (seconds since epoch) when the JWT was created. |
| exp | Expiration: the timestamp (seconds since epoch) after which the token should be considered invalid (and the user no longer authorized). |
To validate a JWT, you must check the following:
- That the signature uses the correct algorithm. If someone presents you with a token that's signed using a symmetric key (or none!) and you expect that it was signed with an asymmetric key, you should reject it without further hesitation.
- That the token has been signed using that signature and the correct key. This means that you'll need access to the public key corresponding to the signer's private key. I'll dive into that in detail below, because the key differs for the two tokens.
- That the “
iss” and “client_id” claims correspond to your user pool and user pool client. - That the “
exp” claim contains a timestamp in the future.
Making validation more painful than it should be, these tokens are signed by different signers, using different algorithms, with different key formats.
The access token is easy to decode: it uses the “rs256” algorithm, and the public key is available as a JWKS (JSON Web Key Set) from the URL
https://cognito-idp.REGION.amazonaws.com/USER_POOL_ID/.well-known/jwks.json (substituting REGION and USER_POOL_ID with
the values for your Cognito user pool). Using the
java-jwt and
jwks-rsa-java from Auth0, here is how you would decode and validate the access token:
private boolean validateAccessToken(String awsRegion, String cognitoPoolId, String accessToken)
throws Exception
{
    DecodedJWT jwt = JWT.decode(accessToken);

    String cognitoIssuer = "https://cognito-idp." + awsRegion + ".amazonaws.com/" + cognitoPoolId;

    JwkProvider provider = new UrlJwkProvider(cognitoIssuer);
    Jwk jwk = provider.get(jwt.getKeyId());

    RSAPublicKey pubkey = (RSAPublicKey)jwk.getPublicKey();
    Algorithm algorithm = Algorithm.RSA256(pubkey, null);

    JWTVerifier verifier = JWT.require(algorithm)
                           .withIssuer(cognitoIssuer)
                           .build();

    try
    {
        verifier.verify(accessToken);
        return true;
    }
    catch (JWTVerificationException ex)
    {
        logger.warn("access token failed validation for {}: {}", jwt.getSubject(), ex.getMessage());
        return false;
    }
}
In a real-world application I would retrieve the JWK once and cache it, rather than
making an HTTP call for every key (some providers rotate their keys, but according to
the documentation, Cognito doesn't). I would also return one or more of the claims
— typically “sub” — rather than a boolean.
Validating the user token isn't quite so easy. In fact, it is sufficiently difficult
that in a real-world application I would extract the “sub” claim from the access token and then contact Cognito directly to retrieve the user
information (caching the result so that I'm not hitting Cognito for every request).
The problem is that this token is signed using the “es256” algorithm. And while that's a perfectly valid algorithm, it's clearly not the first
choice for JWT providers. The Auth0 JWKS library that I used above, for example, only
supports RSA keys.
Making the challenge greater, the load balancer team also decided not to use the JWKS
framework. Instead, they expose an OpenSSL public key file at the URL
https://public-keys.auth.elb.REGION.amazonaws.com/KEY_ID, where
KEY_ID is the “kid” header in the JWT
(so the JWT essentially signs itself). Here's an example:
-----BEGIN PUBLIC KEY-----
MFkwEwYHKoZIzj0CAQYIKoZIzj0DAQcDQgAELvTktrdSseaOZQxiSVgK68u91Rt8
eY/CUJMUTYEyyrbEM1jHuk764ksXSoIS0We2BUhXNpvF/6YMp0qWthwhuA==
-----END PUBLIC KEY-----
That's a Base64-encoded version of the 91-byte key specification. Here's the code in Java to download that key and translate it:
private static ECPublicKey readPublicKey(String url)
throws Exception
{
    StringBuilder keyText = new StringBuilder(1024);
    URLConnection cxt = new URL(url).openConnection();
    try (InputStream in0 = cxt.getInputStream())
    {
        BufferedReader in = new BufferedReader(new InputStreamReader(in0, StandardCharsets.UTF_8));
        String line;
        while ((line = in.readLine()) != null)
        {
            if (! line.contains("PUBLIC KEY"))
                keyText.append(line);
        }
    }

    byte[] keyData = Base64.getDecoder().decode(keyText.toString());
    X509EncodedKeySpec keyspec = new X509EncodedKeySpec(keyData);

    KeyFactory factory = KeyFactory.getInstance("EC");
    return (ECPublicKey)factory.generatePublic(keyspec);
}
Once you've downloaded and converted the public key, verifying the token using it looks a lot like the code used to verify access tokens (although here I skip issuer validation):
public boolean validateUserToken(String keyId, String userToken)
throws Exception
{
    ECPublicKey pubkey = readPublicKey(ALB_PUBLIC_KEY_URL_BASE + keyId);
    Algorithm algorithm = Algorithm.ECDSA256(pubkey, null);

    JWTVerifier verifier = JWT.require(algorithm).build();
    try
    {
        verifier.verify(userToken);
        return true;
    }
    catch (Exception ex)
    {
        logger.warn("user token failed validation using key {}: {}", keyId, ex.getMessage());
        return false;
    }
}
As I said, I'd rather go directly to Cognito to retrieve these claims. Here's an example
that retrieves the user attributes based on the “sub” claim
(with a simple cache to improve performance for returning users):
private String retrieveEmailAddress(String cognitoUserId)
{
    String emailAddress = usernameLookup.get(cognitoUserId);
    if (emailAddress != null)
        return emailAddress;

    logger.debug("retrieving email address for {}", cognitoUserId);
    AdminGetUserRequest request = new AdminGetUserRequest()
                                  .withUserPoolId(cognitoPoolId)
                                  .withUsername(cognitoUserId);
    AdminGetUserResult response = cognitoClient.adminGetUser(request);
    for (AttributeType attr : response.getUserAttributes())
    {
        if ("email".equals(attr.getName()))
        {
            emailAddress = attr.getValue();
            usernameLookup.put(cognitoUserId, emailAddress);
            break;
        }
    }

    return emailAddress;
}
Single-page Applications
In the past decade, web applications have transitioned from individual pages generated by a server and using JavaScript only for interactivity, to “single-page” applications that retrieve data from the server and render their content locally. This type of web-app relies on static content (JavaScript, CSS, and possibly HTML templates) along with an API endpoint, which makes it very easy to deploy on AWS: static content lives on S3 and you can use API Gateway or an ALB to expose the API endpoint.
The problem with this approach, at least in the context of this article, is how to secure the application. An Application Load Balancer can not, at present, retrieve content from S3; that functionality is provided by CloudFront. But CloudFront does not support integration with the Cognito hosted UI; that functionality is only available in the ALB. Faced with this particular Venn diagram of functionality, most of the teams that I've known punt: they turn to client-side interaction with Cognito, using a framework like Amplify.
There is, however, one trick feature of the ALB that can solve this problem: fixed responses.
LoadBalancerHomeDispatchRule:
  Type:                               "AWS::ElasticLoadBalancingV2::ListenerRule"
  Properties:
    ListenerArn:                      !Ref LoadBalancerHTTPSListener
    Priority:                         10
    Conditions:
      - Field:                        "path-pattern"
        Values:
          -                           "/"
    Actions:
      - Type:                         "authenticate-cognito"
        # ...
      - Type:                         "fixed-response"
        Order:                        200
        FixedResponseConfig:
          StatusCode:                 200
          ContentType:                "text/html"
          MessageBody:                |
                                      <!doctype html>
                                      <html lang="en">
                                      <head>
                                          <link rel='StyleSheet' href='...' type='text/css'>
                                          <title>Simple Page</title>
                                      </head>
                                      <body>
                                          <!-- body content omitted -->
                                      </body>
                                      <script src='...'></script>
                                      </html>
The “fixed-response” action allows you to return arbitrary content
to the user. One common usage is for a listener's default action, which is invoked if no other
rule applies: using a fixed response, you can return a 404 (Not Found) status.
But as long as you can fit your main page into 1024 bytes, there's no reason that you can't deliver it in a fixed response. And, as shown here, that lets you require authentication before the user can get to that content.
The remaining challenge is where to store the rest of your static content. You certainly wouldn't want to deliver your entire site as fixed responses, even if you weren't limited to 1024 bytes of content per rule. The simplest approach (at least once you get past CORS configuration) is to store the content on S3 and access it directly or via CloudFront.
What about CloudFront?
The AWS documentation provides three simple steps to enable Cognito authentication when your load balancer is sitting behind a CloudFront distribution. Unfortunately, they don't work.
Returning to the interaction diagram from a few sections ago, note that the first thing
that happens to an unauthenticated user is that the ALB redirect that user to Cognito's
authorization endpoint, /oauth2/authorize. As I noted, it will
pass several parameters in that request, one of which is the URI that Cognito should
redirect back to on successful authentication.
The problem is that the ALB provides its own hostname in that parameter, not the hostname of the CloudFront distribution. Which means that, after successful authentication, you will end up at a URL directly served by the ALB, bypassing CloudFront. What's more, if you try to redirect back to a CloudFront-exposed URL, your next request that goes through the load balancer will trigger re-authentication, because the necessary cookie doesn't have the correct domain. In this case you'll go through the flow as an already-authenticated user, but that still redirects you back to a load balancer-served URL.
Barring a change to the load balancer configuration that allows you to specify the redirect URL, this means that you can't use CloudFront in front of a Cognito-authenticated load balancer. You can still use CloudFront beside the load balancer, with its own hostname, to serve static content or non-authenticated services:

For More Information
If you'd like to dig into the various specifications and documentation for the underlying technologies:
- RFC 6749 defines OAuth 2.0.
- OpenID Connect (OIDC) Core describes the flows implemented by the ALB/Cognito integration. Note that you can use any OIDC-compliant identity server with the ALB, not just Cognito.
- RFC 7519 defines the JWT (JSON Web Token) format, RFC 7518 defines the algorithms used for signing JWTs, and RFC 7517 defines the JWKS (JSON Web Key Set) format.
If you'd like to see a full web-application that uses an ALB/Cognito integration, check out my LambdaPhoto example. As the name implies, it uses Lambdas written in Java to serve the web requests, which is interesting (this was originally written for a Java User Group talk), but probably not the best choice for a production web-app.
Copyright © Keith D Gregory, all rights reserved