Tunneling to an HTTP Proxy
Originally published: 2012-06-27
Last updated: 2012-06-27
Why don't web-mail providers use HTTPS? Most of the time, I don't care; I'm accessing my email from home or work, and I feel confident that nobody's spying on me. But at a coffee shop, hotel, or tech conference, I'm not so sure. I don't have a habit of sending personal information through email, but still …
My solution is to use an HTTP proxy that's running in a “safe” location, and an SSH tunnel to route my browser's requests through that proxy. If you want to follow these instructions, you'll need to start with your “safe” machine. I have an always-on machine at home, but an alternative (if you don't mind paying for bandwidth and uptime) is EC2. These instructions use the standard Amazon Linux AMI, running on a “small” instance (the “micro” instance should be sufficient, but I get annoyed when it throttles performance during installs).
Install the SSH Server (sshd)
The first step to opening a tunnel is to have something listening on the other end. The Amazon AMI comes with the SSH server already installed; it's how you access your instance. Other distributions — Ubuntu, for instance — make you install it yourself. The specifics vary: use whatever package manager you prefer, and look for “openssh-server” (you should have the client already).
You also need to create a key pair if you don't have one already. The instructions in that link are complete, but I have one comment: I can't see the point of securing your key with a passphrase. Everyone that I know who uses a passphrase runs an agent so that they never have to enter it. Instead, I treat keys as disposable: each client machine has its own private key, and if one ever gets compromised (and if I can tell), it will be replaced.
Disallow Password-based Authentication
In my opinion, the most important sshd configuration step is to disable
password-based access: it doesn't matter how weak (or reused) your password is if
nobody can use it. The Amazon AMI is, again, configured this way out of the box.
If you're running on your own machine, open the file /etc/ssh/sshd_config and add/edit the following line (you have to be root to do this):
PasswordAuthentication no
Change the Inbound SSH Port
If you're running on Amazon, the standard SSH port is open by default. If you're on a home network, you need to set port forwarding on your router (see the router's manual) and/or open the port on the machine's own firewall.
That said, I don't like leaving port 22 open: once the cracker bots discover your machine, you'll get literally thousands of break-in attempts on an average day. If you're using key-based authentication, you don't have much to worry about … unless logfiles eat up all of your disk space or the connection attempts act as a denial of service attack. Security by obscurity is actually useful here: bots don't waste their time hitting arbitrary ports, so if you pick such a port — say, 9876 — you reduce the number of connection attempts.
Another reason for selecting a non-standard port is if the network that you're connecting from limits the ports that you can use to connect. For example, I once worked for a company that only allowed outbound traffic on ports 22, 80, and 443. To open a tunnel, I configured SSH to listen on port 443 (which will get less bot traffic than 80).
In either case, edit /etc/ssh/sshd_config, find the current
Port entry, and add a new one. Whether you leave the existing
port alone (and block it through the firewall) or delete it entirely is up to you. I
don't like deleting the current entry until I'm very sure that the replacement
works.
Port 22
Port 9876
If you're running on an Amazon instance, don't forget to update your security group to enable this port. You can do this while the instance is running.
Restart SSHD and Test
That's all the SSH configuration, so it's time to restart the server:
sudo /etc/init.d/sshd restart
You should be able to connect on your non-standard port, using your public key. This is where running on Amazon is nice: if you screwed something up (especially if you disabled the default SSH access), simply terminate the instance and start over.
ssh -p 9876 ec2-user@ec2-50-19-152-185.compute-1.amazonaws.com
Install and Configure Apache
Every Linux distro seems to have a different way to install Apache, and more important, different locations for its configuration files. If you're running on Amazon, here's the installation command:
sudo yum install httpd.i686
Next, you need to find the Apache configuration file, httpd.conf.
For the Amazon instance, it's in /etc/httpd/conf; for
Ubuntu I believe it's somewhere in /opt (I was sufficiently
annoyed by the hunt that I built my home server from source).
You need to make two changes to this file: enable the proxy modules if they're not already enabled, and create a virtual host to act as the proxy. The first step is straightforward: make sure the following lines are uncommented (they already are in the Amazon install, along with a few proxy-related modules that we don't care about):
LoadModule proxy_module modules/mod_proxy.so
LoadModule proxy_ftp_module modules/mod_proxy_ftp.so
LoadModule proxy_http_module modules/mod_proxy_http.so
LoadModule proxy_connect_module modules/mod_proxy_connect.so
Setting up the proxy is also straightforward, but requires some explanation. Out of the box, Apache listens on port 80 of all network interfaces. You can enable a proxy that uses this port as well, but that's a bit risky: if you decide open your firewall and serve content to the Internet at large, you'll create an open proxy, which most people consider a Bad Thing. Don't blame me if the FBI knocks on your door because everyone's downloading kiddie porn via your server.
Instead, create your proxy as a virtual host, limited to the loopback network address, with a distinct port number; here I use 9999.
Listen 127.0.0.1:9999

<VirtualHost 127.0.0.1:9999>
    ProxyRequests On
    ProxyPreserveHost On
    ProxyVia On

    <Proxy *>
        Order deny,allow
        Allow from all
    </Proxy>
</VirtualHost>
Note that in this example I haven't bothered to change DocumentRoot for the proxy: whatever content your server delivers on port 80 will also be
delivered to local clients on the proxy port. In my opinion, that's not a big
deal. And if you're running on EC2, the default document root points at a
directory that isn't readable by Apache.
Restart Apache and run netstat to verify that it's listening on
port 9999.
> sudo apachectl restart
httpd not running, trying to start

> netstat -an | grep 9999
tcp        0      0 :::9999                     :::*                        LISTEN
Open the Tunnel
Assuming that you have a command-line SSH client, the following command opens the
tunnel and then runs in the background. To close the tunnel, you'll have to use
kill. You can omit the -fN, in which case
you'll have an interactive session to your proxy host. But if you're like me, you'll
switch to that window by accident, and wonder why none of your working files are there.
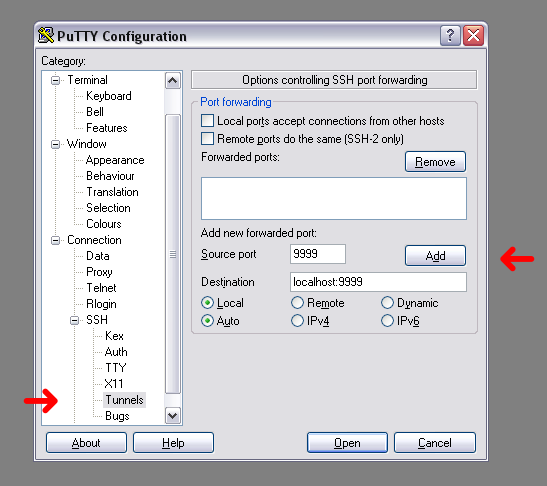
ssh -fN -L 9999:localhost:9999 ec2-user@ec2-50-19-152-185.compute-1.amazonaws.com
If you're using PuTTy as your SSH client, you can set up port forwarding in the
session configuration.

Configure your Browser
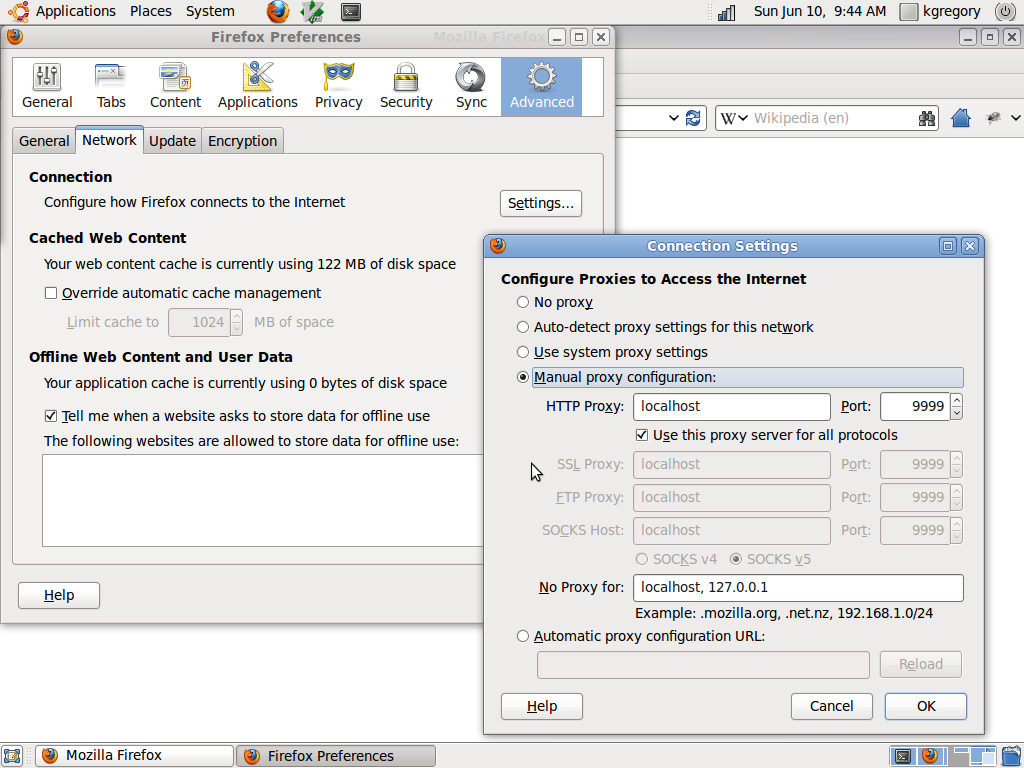
This is another case where everyone's different. I use Firefox as my primary browser,
and with it you open the “Options” dialog, go to the “Advanced”
tab, “Network” subtab, and click on the “Settings” button (yes,
I realize that anyone reading this page knows how to set options; it's just humorous to
me to describe the path to a particular setting). This brings up the “Connection
Settings” dialog, where you want to select manual proxy configuration. A picture
is worth more than 1,000 words here:

Other browsers will have something similar. For IE, you'll need to configure this in the “Internet Settings” control panel.
Profit!
If everything works, you should see all of your browser requests in the Apache log.
> sudo tail -f /var/log/httpd/access_log

127.0.0.1 - - [10/Jun/2012:13:06:00 +0000] "GET / HTTP/1.0" 403 3839 "-" "Wget/1.12 (linux-gnu)"
127.0.0.1 - - [10/Jun/2012:13:06:32 +0000] "GET / HTTP/1.0" 403 3839 "-" "Wget/1.12 (linux-gnu)"
127.0.0.1 - - [10/Jun/2012:13:26:22 +0000] "GET http://www.kdgregory.com/ HTTP/1.1" 200 4282 "-" "Mozilla/5.0 (X11; Ubuntu; Linux i686; rv:13.0) Gecko/20100101 Firefox/13.0"
127.0.0.1 - - [10/Jun/2012:13:26:23 +0000] "GET http://www.kdgregory.com/css/common.css HTTP/1.1" 200 5507 "http://www.kdgregory.com/" "Mozilla/5.0 (X11; Ubuntu; Linux i686; rv:13.0) Gecko/20100101 Firefox/13.0"
127.0.0.1 - - [10/Jun/2012:13:26:26 +0000] "GET http://www.kdgregory.com/favicon.ico HTTP/1.1" 200 1406 "-" "Mozilla/5.0 (X11; Ubuntu; Linux i686; rv:13.0) Gecko/20100101 Firefox/13.0"
Conclusion
I'll finish with some caveats. First is that your browsing speed is limited by the bandwidth of your proxy. This isn't an issue with Amazon EC2, which has fast connections both in and out. If you're running at home over a slow ADSL connection, however, you'll feel like you're back in the days of dial-up. Not a problem if all you're doing is reading email, but image downloads will be painful.
Second: If you are using Amazon EC2, you'll be paying for bandwidth. Although, at pennies per gigabyte, it will be far cheaper to do this than to tether your phone.
Next: this is a secure connection from your browser to your proxy; after that, you're in the wild. Personally, I'm not too worried about people snooping on the Internet backbone: those who are likely to snoop are also likely to have the compute power to break whatever encryption I might choose to use. I don't know what protections EC2 has against sniffers in their complex, but will assume that it's unlikely to be an issue. If you're concerned, you need to use an encrypted connection from your browser all the way to the other end.
And finally: be aware that this tunnel will bypass whatever content filters your company or organization has in place (unless they're browser extensions). If you signed some agreement that says you will abide by those content restrictions, you shouldn't follow these instructions.
Copyright © Keith D Gregory, all rights reserved